Ask us about electric heated driveways.
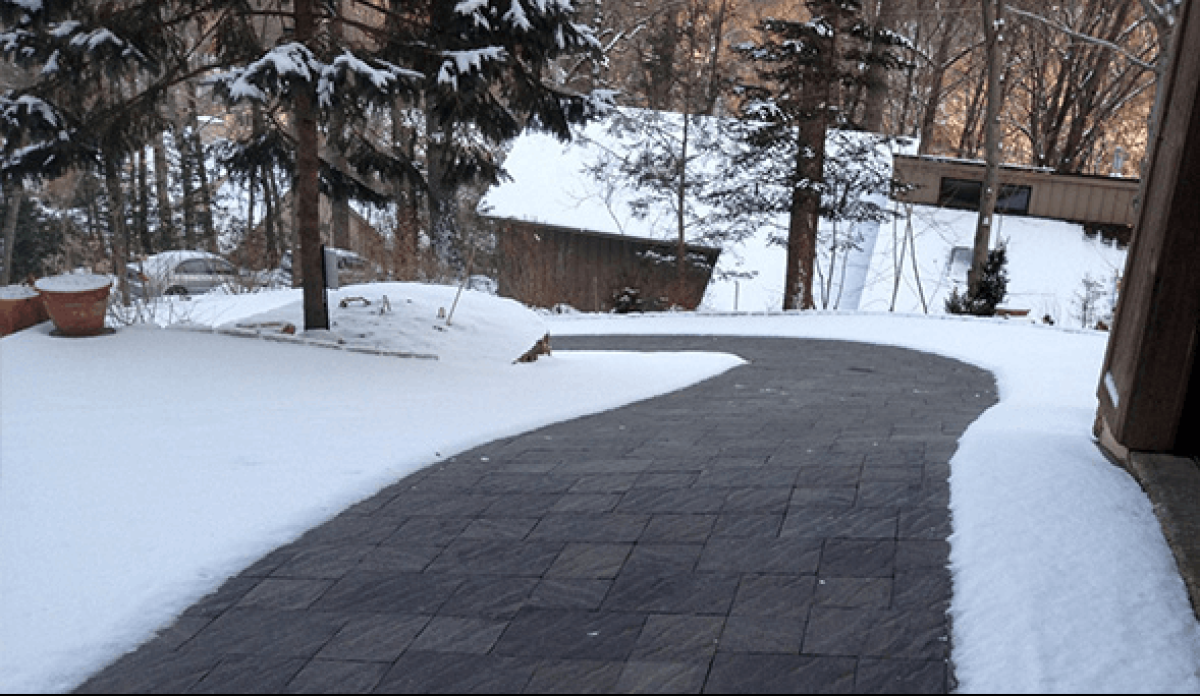
Electric radiant heating embedded in your driveway surface eliminates snow and ice removal — automatically, before accumulation becomes a problem. Conard's Concrete installs the heating system in concrete or asphalt driveways across Western North Carolina. Concrete is poured in-house. Asphalt is coordinated with a trusted paving partner. Either way, Conard's manages the project.
Electric heating cable embedded in your driveway surface.
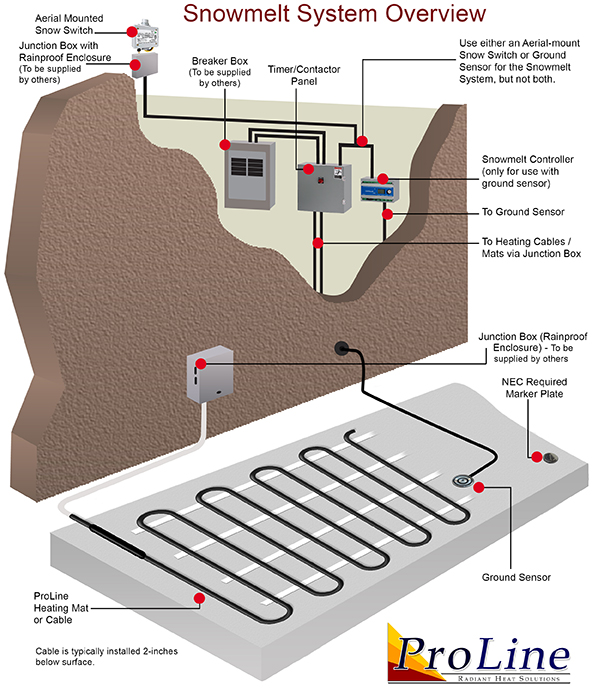
Electric snow melting systems use resistive heating cable or mats laid out across the driveway surface area before the final surface material is applied. A ground-mounted sensor detects temperature and moisture — when precipitation begins and the temperature drops below the set point (typically 39°F), the controller activates the system automatically. The driveway warms from below, melting snow as it falls.
After the storm passes, the system's built-in hold-on timer keeps the surface warm long enough to dry it completely — preventing melted snow from refreezing as black ice. No shoveling, no salting, no plowing service required.
An often-overlooked benefit: Embedded radiant heat extends the life of your driveway surface. Concrete and asphalt are both porous — water from melted snow seeps into surface cracks, refreezes, expands, and causes spalling and surface deterioration over time. A heated driveway keeps the surface dry, dramatically reducing freeze-thaw damage and potentially adding years to the life of the slab.
Both surfaces work. The installation differs significantly.
Electric heated driveways are compatible with both concrete and asphalt surfaces. The heating system hardware is similar — how and when it goes in is not. Understanding the differences helps you choose the right surface for your project and budget.
Concrete
Heating cables or mats are tied directly to the wire reinforcement mesh before the concrete pour. The slab is placed over the top, permanently embedding the system up to four inches deep. Cable continuity is verified before and after the pour.
Concrete's thermal mass distributes heat evenly and retains it efficiently. The finished system is fully protected inside a surface that lasts 30 or more years with proper care.
Asphalt
Asphalt requires ruggedized cables specifically rated for the extreme heat (approximately 300°F to 350°F) and pressure of hot-mix asphalt application and rolling equipment. Cables are placed in the sand and gravel base layer before the asphalt is laid over the top.
Conard's manages the heating system installation and coordinates the asphalt surface work with a qualified paving partner. One call, one project.
| Feature | Concrete | Asphalt |
|---|---|---|
| Cable placement | Tied to wire mesh before pour | Placed in sand/gravel base beneath asphalt layer |
| Surface lifespan | 30+ years | 15–20 years |
| Surface maintenance | Minimal | Reseal every 2–3 years |
| Thermal sensitivity | Requires gradual ramp-up on first use | Risk of softening under extreme heat or overheating |
| Retrofitting | Extremely difficult — requires deep saw cuts | Moderately easier — grooves cut and sealed |
| Who installs at Conard's | In-house | Paving partner coordinated by Conard's |
How a heated driveway is installed.
The steps below reflect a concrete installation. Asphalt follows the same general sequence with the cable placement adapted to the asphalt base layer instead of the concrete reinforcement mesh.
Site prep and forming
Standard driveway prep — grade, base, and formwork set as with any driveway pour.
Reinforcement and cable layout
Wire reinforcement mesh is placed, then heating cables or mats are laid out and tied to the mesh at the specified spacing for the required wattage per square foot.
Electrical rough-in
Lead wires are routed to the panel location. A licensed electrician installs the controller, snow and moisture sensor, and final connections — coordinated separately from the concrete work.
Surface pour and finish
Concrete is placed over the cable layout and finished to standard. Cable continuity is verified before and after the pour. For asphalt, the paving partner applies the hot-mix over the laid cables.
Cure and thermal ramp-up
New concrete must fully cure before activation. The system is brought online gradually on first use — never switched directly to full power — to prevent thermal stress in the slab.
Controller and sensor setup
The automated controller is programmed with hold-on timers to dry the surface after precipitation stops, preventing black ice formation after the storm passes.
More than just convenience.
Eliminates snow removal
No shoveling, no plowing service, no salting. The system activates automatically when precipitation begins and shuts off when the surface is dry.
Prevents black ice
The after-run hold-on timer keeps the surface warm after the storm passes, drying the surface completely before temperatures drop and melted snow can refreeze.
Extends driveway life
Keeping the surface dry prevents water infiltration and freeze-thaw cycling — the primary cause of spalling and cracking in both concrete and asphalt driveways in cold climates.
Improves safety
A clear, dry driveway surface reduces slip and fall hazards and eliminates the risk of vehicles losing traction on steep grades — a real concern on many Western North Carolina properties.
Adds property value
Radiant heated driveways are an increasingly expected feature in upscale residential properties. Adding one is a lasting improvement that increases resale value.
Customizable coverage
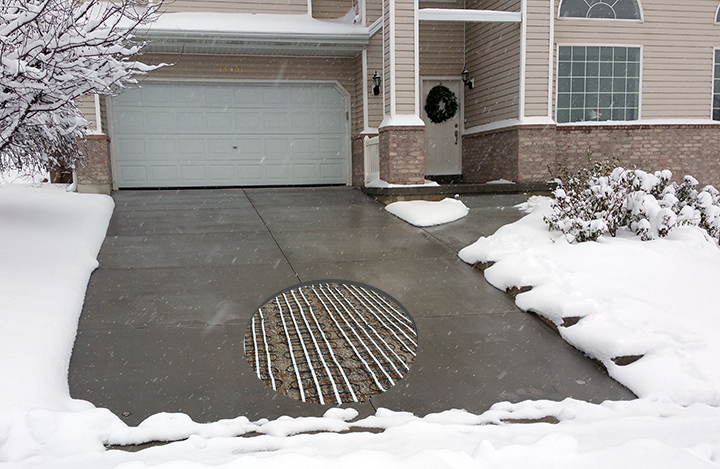
Full driveway coverage is not required. Systems can be designed for two heated tire tracks, a steep section only, or any combination — allowing the installation to fit your budget and priorities.
What a heated driveway costs to install and run.
| Cost Item | Typical Range | Notes |
|---|---|---|
| Complete installed project | $12 – $28 per sq ft | Includes surface material, heating system, and electrical labor. Varies by driveway size, cable density, surface type, and site conditions. |
| Heating cable or mats only | $3,200 – $5,800 | Hardware cost for the heating system, depending on square footage covered. |
| System power draw | 37 – 50 watts per sq ft | Standard snow melting rate of 1 to 3 inches per hour. |
| Operating cost per storm | ~$21 – $30 per storm | Based on a 400 sq ft driveway at local Haywood County rates. See rate detail below. |
Local electricity rates — Haywood County
Haywood Electric Membership Corporation (HEMC)
HEMC residential rates average around $0.17 per kWh — slightly above the national average. As a cooperative, your exact rate depends on your billing class, base facility fees, seasonal wholesale cost adjustments, and whether you participate in a Time-of-Use plan. Contact HEMC directly for your specific rate schedule at haywoodemc.com.
Duke Energy Carolinas
Duke Energy Carolinas serves most of the remaining county. All-in residential cost runs approximately 12.5 to 14 cents per kWh, with minor variation based on monthly consumption, the basic facilities charge, and seasonal fuel cost adjustments.
Estimating your operating cost:
A 400 sq ft driveway with a 40-watt-per-sq-ft system draws 16,000 watts (16 kW) per hour of operation. At HEMC's average rate of $0.17/kWh that is approximately $2.72 per hour of run time — roughly $27 – $30 per storm on a 10-hour cycle. At Duke Energy's rate of $0.13/kWh the same cycle runs approximately $21 – $24.
Annual operating cost depends on how many storm events trigger the system each winter. Western North Carolina winters vary — a mild season may mean very few activations. Most homeowners find the cost straightforward relative to the alternative of manual snow removal on a long or steep driveway.
Partial coverage reduces cost proportionally. Heating two 24-inch tire tracks on a standard two-car driveway rather than the full surface can cut system hardware and operating costs significantly while still solving the practical problem.
Talk to Conard's about your driveway project.
If you are planning a new driveway — concrete or asphalt — and want to discuss adding a radiant heating system, call for a free estimate. Conard's handles the heating system installation and coordinates everything else.